
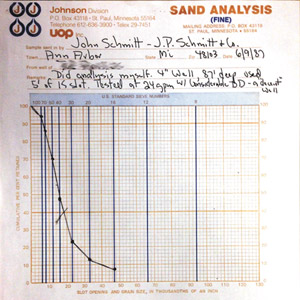
At the end of my last column, I had discussed how to do a graduated sieve analysis of a sand and gravel aquifer and hinted at how we might select our screen openings from this. As you will recall, I described how we could plot the analysis of our formation on graph paper with slot openings or grain size in thousandths of an inch on the horizontal scale with zero at the far left. The vertical scale will list cumulative percent retained from zero at the bottom to 100 at the top. If we plot what our graduated sieves have retained, we will develop an S curve or we can simply connect the dots as a child might do.
(Take our poll here: How do you choose your screen size for water wells?)
Having completed these steps, we can now select the slot size or screen opening that we will use. Since many hydrogeologists and screen company representatives recommend we select a slot size at 40 percent retained weight, this will be really simple—no, actually, it is not that simple. I am a contractor and not a hydrogeologist, but I have been warned that if our curve is not really smooth and “regular,” we had better be careful because our formation is not well graded and this can cause us trouble. Now, I believe that most curves will come out to be smooth and regular, but we all know that as drillers we talk about our tough ones and failures, not the jobs that went as smooth as can be. If, indeed, you have an irregular curve—and this is really important—you probably better consult a hydrogeologist or a good screen man when making your selection.
Now, our screen company reps and hydrogeologists may not agree with this next statement, but I found with domestic wells that retention of 50, 60 or even 70 percent worked out just fine. I will admit that, for a commercial, municipal or irrigation well designed to give us the least drawdown on pumping and the best efficiency overall, it is more important than for a domestic well, which we are usually going to pump from 10 to 40 gpm. I have talked about this with a good contractor for whom I have great respect, and he says that, in his area, if you tried to retain 40 percent of the formation you would end up retaining 0 percent. I have never seen a sample of what he completes his wells in, but he must have some material that is not well graded and you would need to exercise extra care when selecting your screen. I have known a few other drillers who just use the same size screen in every well, and usually a pretty fine one.
|
|
Most sieve analyses yield an S curve, as shown. If yours doesn’t, columnist John Schmitt recommends consulting a hydrogeologist or screen expert. Source: John Schmitt |
While this saves on inventory, it isn’t doing the best job for the consumer. Another practice I have heard of is to use an overly generous opening and then pump the well at only partial capacity. I’m afraid I can’t agree with this at all. In my opinion, in a completed well we should be able to draw the water level down right to the top of the screen and the well will make no sand.
As with many things in drilling, experience is the best teacher and those of you who set screens everyday know what I am talking about. However, when I tried to size a screen by the eyeball method and later sieved the sample, I found that I was almost always going too small on my slot sizes or too conservative. For the record, the coarsest screens I ever set were 75 slot, or .075 inch openings, for a couple of commercial wells used by a business. I guess the final thought on this is a paraphrased statement from a major screen company that is printed on the graph paper they supply for sand analysis. It reads as follows: “So many considerations enter into the making of a good well that, while we believe slot sizes furnished or recommended from sand samples are correct, we assume no responsibility for the successful operation of ????? well screens.” (I have withheld the name of the screen company for privacy considerations.)
Well, so much for selecting screen openings and, as you can tell, experience is a big factor and so is geology. You also understand that I am only relating my experiences as a contractor and make no claims or warranties, either express or implied, that these methods will work for everyone.
After we have selected a screen size, material and slot openings, our next decision is how to install the screen. For this, there are three main ways to go. These include driving the screen into the aquifer, washing or bailing it in, and using the so-called pullback method. Now, I am talking about installing a screen in a cable tool or jetted hole. A rotary hole is a different animal, which I will discuss briefly later.
Of these, the drive-in method is the simplest. This is done by cleaning out our casing to the bottom and dropping or pushing the screen in and, since the screen will have a point on it, just hammering it into the formation using a drill string or our jetting rods. I know some fellows who use an extra heavy point and then a steel rod—slightly smaller than the inside diameter of the screen and a little longer—and dragging the screen into the formation by beating on the bottom. I always just drove from the top and did many of these on replacements and, as long as your screen is strong enough, it works just fine. Generally, if you are going into a good aquifer, it will be loose and the screen will go in easily. The downside is that you don’t really know what you are driving into, so I guess this could be called the “by guess and by gosh” method. That being said, it does work and my dad and I installed hundreds of screens in 2- and 3-inch wells by this method.
Well readers, I have gotten to the word limit that my editor, Jeremy, an altogether good fellow likes. So we will have to talk about washing or jetting screens in, or installing by the pullback method, next time.
We have had a delightful early fall here in Michigan and enough rain that we are still mowing. In fact, I mowed my lawn yesterday. Until next time, work hard, be safe and good luck on selecting those screens.


Report Abusive Comment